Figma plugin have been here for almost two years now, and I've been playing with them early on.
I find them really useful to convert my codes from CodePen, usually made with canvas, into SVG paths.
As the plugins are written in JavaScript, it was quite straightforward for me to get started with them.
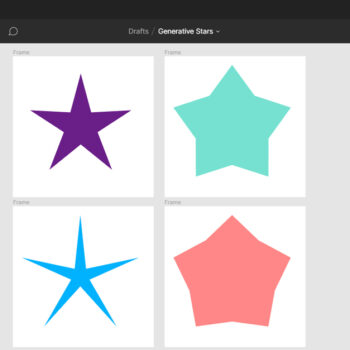
In this article, I will show you how to setup a basic plugin from scratch to create some generative stars.
⚠️ Unpublished plugins are only available on the desktop version of Figma.
If you are not familiar with the Figma interface, you should still be able to follow by checking the screenshots below.
The files we will create further below can be located anywhere on your computer, as long as they are grouped in a single folder.
Step 1: The manifest
Each plugin requires a manifest.json file to let Figma knows some basic information.
name: The name of your plugin as it will appear in Figma's menuapi: The version of the Figma API your plugin is based on. Currently it is 1.0.0main: The relative path to the JavaScript file of your pluginui: The relative path to the HTML file of the UI of your plugin (optional)
{
  "name": "Generative Stars",
  "api": "1.0.0",
  "main": "code.js",
  "ui": "ui.html"
}
manifest.json
Step 2: Creating a new frame
To keep our Figma file clean, it's nice to create a new frame each time we will run our plugin and append all the shapes in it.
With the code below, we are creating a new frame with a dimension of 800px * 800px.
The lines 4 & 5 are here to centre the new frame in the middle of the viewport so that you can pan into your file, re-run the plugin and always have the frame centered where you are looking at.
const frameSize = 800;
const frame = figma.createFrame();
frame.resizeWithoutConstraints(frameSize, frameSize);

frame.x = figma.viewport.center.x - (frameSize / 2);
frame.y = figma.viewport.center.y - (frameSize / 2);
code.js
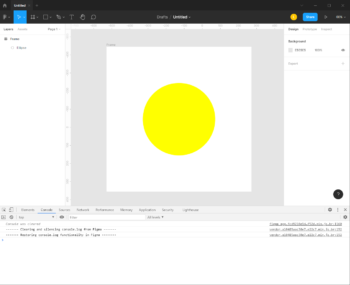
Step 3: Creating a circle
Now let's add a circle in the centre of our frame.
First we use the Figma function createEllipse() to create a basic geometry for an ellipse.
Once created, we append that circle into our frame. If you skip this line, the circle will be a direct child of your page and all its coordinates will be relative to your document origin.
We then resize our ellipse with the dimensions needed (here 400px * 400px).
To centre the circle, we should not define the centre X & Y coordinates of it but the X & Y coordinates of its box.
Since the frame is 800px wide and the circle has a diameter of 400px, we know that it should be 200px away from the left and the top to be centered.
The give a yellow colour to the circle, we are defining the fills property with an array of objects.
In this example we are using a plain colour of rgb(1, 1, 0) but you could define a gradient or even an image.
Finally we let Figma know that the plugin is done and it can close its process.
const circle = figma.createEllipse();
frame.appendChild(circle);
circle.resize(400, 400);
circle.x = 200;
circle.y = 200;
circle.fills = [
    {
        type: 'SOLID',
        color: {r: 1, g: 1, b: 0}
    }
];

figma.closePlugin();
Step 4: Running the plugin
Let's give this basic example a try directly into Figma!
Create a new document and right click anywhere in the artboard and choose Plugins -> Development -> New plugin...
In that overlay, you can use Click to choose a manifest.json file to select your manifest.json file created before.
If you didn't make any error in the manifest.json or the code.js files, your plugin should be available in the context menu Plugins -> Development -> Generative Stars
You can click on it, and it should run your freshly created plugin ✨
Figma has devtools available just like any browser to help you to debug! Right click -> Plugins -> Development -> Open console
Step 5: Generating random stars
Now that the setup for our plugin is ready, we can start writing some more interesting code to generate complex paths.
The code below will generate a star with a random inner and outer radius.
One basic way of drawing a star is to loop over 11 points, that are all along a circle. See the illustration below that shows you all points. We start from 0, on the outer radius, then point 1 is along the inner radius and so on.
I've added comments inside the code, if you have more questions don't hesitate to ask them directly to me :)

// The string path of our star
let pathData = '';
// Random outside radius between [100px, 350px]
let outsideRadius = Math.random() * 250 + 100;
// Random inside radius between ([0.2, 0.7] * outside radius)
let insideRadius = outsideRadius * (Math.random() * 0.5 + 0.2);
// To draw a star we need to loop through its 11 points
// We need to loop 11 times to close the path back to the first point
for (let i = 0; i <= 10; i++) {
	// The angle of the point from 0 to two pi (0 -> 360deg)
	let angle = i / 10 * Math.PI * 2;
	// Calculate the x & y coordinates from the angle
	let x = Math.cos(angle - Math.PI / 2);
	let y = Math.sin(angle - Math.PI / 2);

	// Only for the first point we want to move instead of drawing a line
	if (i === 0) {
		pathData = `M ${x * outsideRadius} ${y * outsideRadius}`;
	} else {
		if (i % 2 === 1) {
			// If the point is odd, calculate the coordinates along the inner radius
			pathData += ` L ${x * insideRadius} ${y * insideRadius}`;
		} else {
			// Else, for even points, calculate along the outside radius
			pathData += ` L ${x * outsideRadius} ${y * outsideRadius}`;
		}
	}
}

// Create a vector element
const node = figma.createVector();
// Define the path properties
node.vectorPaths = [{
    windingRule: 'NONZERO',
    data: pathData
}];
// Center the star in the center of the frame
node.x = (frameSize - (outsideRadius * 2)) / 2;
node.y = (frameSize - (outsideRadius * 2)) / 2;
// Append the star to the frame
frame.appendChild(node);
// Define a single stroke with a random color
node.strokes = [{
    type: 'SOLID',
    color: {r: Math.random(), g: Math.random(), b: Math.random()}
}];
You can use the shortcut (Ctrl + Alt + P) or (⌥ + ⌘ + P) to run the last plugin used again
Step 6: Adding a UI
For now our plugin is running on its own and you or your users don't have any interaction possible with it.
Figma allows you to open a window with any HTML you want in order to give control to your users.
In this last step we will add a little form to control the inner and outer radii and a submit button.
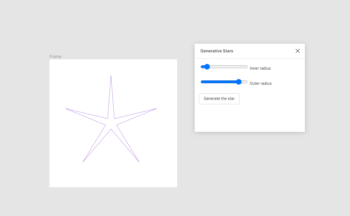
Our code.js file was running everything when being loaded. To avoid that, we are asking Figma to open the window based on the ui.html file and wait for any message to come from that window.
When the user will submit the form with the custom radii, we send the values to the code.js file and then generate the stars from them.
Check the highlighted lines below, those are the ones that have been updated from the previous step.
// Ask Figma to open the window
figma.showUI(__html__);

// Wait for the window to send a message to the plugin
figma.ui.onmessage = data => {
	const frameSize = 800;
	const frame = figma.createFrame();
	frame.resizeWithoutConstraints(frameSize, frameSize);

	frame.x = figma.viewport.center.x - (frameSize / 2);
	frame.y = figma.viewport.center.y - (frameSize / 2);

	// The string path of our star
	let pathData = '';
	// Retrieve the outer & inner data from the submitted form
	let outsideRadius = data.outer;
	let insideRadius = data.inner;
	// To draw a star we need to loop through its 10 points
	// We need to loop 11 times to close the path back to the first point
	for (let i = 0; i <= 10; i++) {
		// The angle of the point from 0 to two pi (0 -> 360deg)
		let angle = i / 10 * Math.PI * 2;
		// Calculate the x & y coordinates from the angle
		let x = Math.cos(angle - Math.PI / 2);
		let y = Math.sin(angle - Math.PI / 2);

		// Only for the first point we want to move instead of making a line
		if (i === 0) {
			pathData = `M ${x * outsideRadius} ${y * outsideRadius}`;
		} else {
			if (i % 2 === 1) {
				// If the point is odd, calculate the coordinates along the inner radius
				pathData += ` L ${x * insideRadius} ${y * insideRadius}`;
			} else {
				// Else, for even points, calculate along the outside radius
				pathData += ` L ${x * outsideRadius} ${y * outsideRadius}`;
			}
		}
	}

	// Create a vector element
	const node = figma.createVector();
	// Define the path properties
	node.vectorPaths = [{
	    windingRule: 'NONZERO',
	    data: pathData
	}];
	// Center the star in the center of the frame
	node.x = (frameSize - (outsideRadius * 2)) / 2;
	node.y = (frameSize - (outsideRadius * 2)) / 2;
	// Append the star to the frame
	frame.appendChild(node);
	// Define a single stroke with a random color
	node.strokes = [{
	    type: 'SOLID',
	    color: {r: Math.random(), g: Math.random(), b: Math.random()}
	}];
}
code.js
The code below is the ui.html file.
It is divided in two parts, first the CSS/HTML needed to show the form to our users. Then the script to detect when we submit the form and to send the form data to the plugin.
<!-- Load the basic CSS from Figma to get a native look -->
<link rel="stylesheet" href="https://static.figma.com/api/figma-extension-api-0.0.1.css">
<!-- Add some styles to make it look nicer -->
<style>
  label {
    display: block;
    margin-bottom: 20px;
  }
</style>

<!-- The form with two inputs and a submit button -->
<form id="form">
  <label>
    Inner radius
    <input type="range" min="10" max="300" value="100" id="inner">
  </label>
  <label>
    Outer radius
    <input type="range" min="10" max="350" value="300" id="outer">
  </label>
  <button>Generate the star</button>
</form>

<script>
  // Detect submit event on the form
  document.querySelector('#form').addEventListener('submit', (e) => {
    // Prevent the form to actually being submitted
    e.preventDefault();
    // Send a message to the plugin
    parent.postMessage({
      // Include the inner & outer radii values as integers
      pluginMessage: {
        inner: parseInt(document.querySelector('#inner').value),
        outer: parseInt(document.querySelector('#outer').value)
      }
    }, '*');
  });
</script>
ui.html
If you now run your plugin, you'll have a little popup showing first and once you completed the form with the values needed you can click on the button and get your star! ⭐
Conclusion
This tutorial is really an introduction to the world of Figma plugins.
If you want to go further, you can read the official documentation that contains lots of useful information:
Figma Developers documentation
The API reference is also very important as it contains all the functions and properties available for all elements you can generate.
If you want to go further, try improving the little demo you did today.
- Adding colour control inside the UI
- Generating other shapes than stars
- Output multiple stars with random sizes in a single frame
I hope this tutorial will be helpful to you and if you have any more question I'm available on Twitter 👋